Watch the Route Planner video.
With a permit application open, select Step 2 Route from the steps along the top of the screen![]() .
.
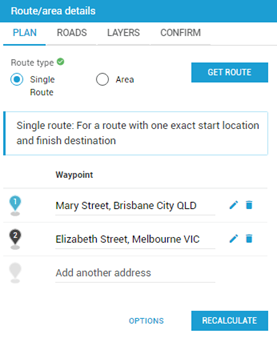
PLAN Tab
Select the Route Type – Single Route![]() .
.
GET ROUTE
To use a previous- Select Step 3 Route.
- Select Plan tab.
- Select Single Route.
Use a Previous Route
- Click Get Route to use a previous route (Journey Planner or Route Planner
- ).
- Enter Route ID, if available or for Journey Planner
- select the Version
Or, for a new route, type in
- .
- Click Load Route.
New Route
- Enter the start, end and waypoints using the full address details.
- The route will display on the interactive
- map and a Route Id will be automatically assigned (this can be reused on other permit applications).
- Rollover any point on the route and click to
- drag and drop to move route or waypoints.
Use the
drop-pin
to add new waypoints to
the route
, or rollover any point on the route to
drag and drop a waypoint.
Tip  Select the drop-pin, click to blue for ON / or black for OFF
- Delete or edit the waypoint
- using the buttons (including changing the waypoint
- labels).
- Drawing and measuring tools are also available
OPTIONS Button
RECALCULATE Button
If your Route is not displaying, use the RECALCULATE Button ![]() .
.
ROADS Tab
- (bottom left of the map display).
- If the route is not displaying, click recalculate.
- Select Options to change routing preference or routing constraints.
Roads tab
- Select the expand icon to see the list of roads under each road owner
- .
- Click on any road to add specific notes
- , such as local road name.
LAYERS Tab
You can useLayers tab
- Use the slide tool to toggle the colours on the route layer or map layer
- . On this tab, you can also view and turn on/off the map layers. Use
- the Layer legend for a grouped view of available layers or the Layer list
- .
- Road layers are automatically set depending on the vehicle configuration you select. To turn on all layers, tick 'Show all layers'.
| Tip |
|---|
Map layers can be selected from either the |
Layers tab or the Stack icon |
on the |
map. Selections made in one list will |
show in the other. The |
Layers tab view allows you to |
see the full map when switching layers on / off. |
CONFIRM Tab
Finally, select the CONFIRM tab where the Road summaryConfirm tab
- Select the Confirm tab.
- The Road Summary will display.
- Add any notes related to the application, at the bottom of the screen.
- Confirm the route using the
- checkbox.
- Save.
See
the next Step: How to complete Step 3 of the permit application – Permit Period| icon | false |
|---|