An importing tool for uploading vehicle details/ registrations for multiple vehicles.
Step-by-step
When you navigate from either Vehicle Configurations/ Permit Applications or Permit Actions (Amend), some Some vehicle types will require additional details to be entered . If you have a fleet of vehicles, you may wish to use the upload/ import function to save time in entering this data.When you import any of the following vehicle data into the Portalincluding:
- VIN (required field for all imports)
- Registration number number
- Registration state state
- GVM (t)
- GTM (t)
- GCM (t)
| title | Import feature |
|---|
If you have a fleet of vehicles, you may wish to use the upload / import function to save time.
| Tip |
|---|
The Import from CSV File button will only appear when the vehicle registration details are required/ mandatory fields. |
Import from within Vehicle
configurationsIn Vehicle Configurations, click on the vehicle tab .
.If
Configurations
- Navigate to Access Permits> Vehicle Configurations.
- All saved vehicle configurations for the active account will be listed.
- Scroll through the list or use the drop-down filters to find the vehicle configuration required.
- Select the required vehicle.
- On the configuration screen, navigate to a component tab (to the right of the Overall tab).

- Select Import from CSV File (only visible if it is mandatory for the selected vehicle to have additional information such as registration, the Import from CSV File button will display

You can download the Excel (xls) import template from the Download Import Template link and add your vehicle details
  . Be sure to delete the sample data and then save the file onto your computer.
Review the template instructions, which are:
TIPS FOR USING THIS TEMPLATE:). - Select CSV file from your folders. Click Open to import into Portal.
- Click Save.
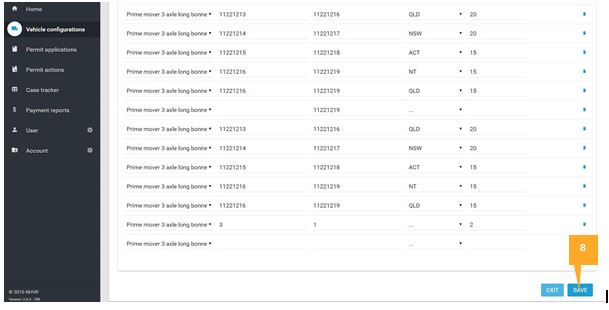
A list of all vehicle components attached to your account will appear under Vehicle List.

Create a CSV File to Import
- Select Download Import Template.
Add vehicle details.
Tip - If any data starts with zero, use a single quote before the zero - eg. '007LHT. This will stop excel automatically changing the format.
- The VIN field must contain data, if left blank the entire row of data will be skipped on import.
- For ease of use, create a new vehicle list for each component being imported.
- Delete sample data.
- Save file as.
-----------------------------------------
IMPORTING RULES: csv. - Select Import from CSV File (only visible if it is mandatory for the selected vehicle to have additional information such as registration).
- Select CSV file from your folders. Click Open to import into Portal.
Click Save to save your template in the NHVR Portal.
Warning title Importing Rules When you import a new CSV file, the existing vehicle information will be cleared to avoid duplication.
The NHVR Portal will automatically select and import only the required data:
~ Data in the GVM(t), GTM(t), GCM(t) fields will only be imported if it is a required field for that vehicle component type.
~ Data in the Component type/ Add or remove fields will only be imported for Amend application types.Once vehicle details are added and saved into the template, import the template into to the Portal via the Import from CSV File button
 . This will open a window in your system, select the template
  and click Open to import into the Portal..
 Once the template is imported into the portal, a list of all vehicles attached to your account appears allowing you to view vehicle configurations and components
 .
. note
- A list of all vehicle components attached to your account will appear under Vehicle List.
| Warning | ||
|---|---|---|
|
| |
When you upload your vehicle list under Vehicle Configurations, there will be no validation of vehicle details until you use those configurations in a permit application |
 , a green box will appear advising you that the import was successful
. |