...
Watch the Route Planner video.
...
- Select Step 3 Route
...
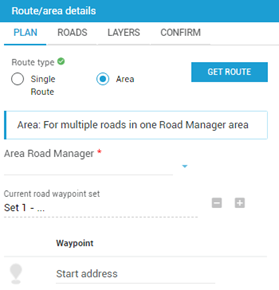
PLAN tab > Select the Route Type – Area Route
...
- .
- Select Plan tab.
- Select Area.
Use a Previous Route/ Existing Route
- Click Get Route to use a previous route (Journey Planner or Route Planner)
...
| Expand | ||
|---|---|---|
| ||
Add the Application ID if available or for Journey Planner, select the Version.
|

3. To plot a new area application within a single Road Manager boundary:
| Expand | ||
|---|---|---|
| ||
|
OR
...
| title | Click to expand... |
|---|
...
- .
- Enter Route ID.
- Click Load Route.
| Tip |
|---|
Area applications are made up of a number of short road sections that connect from/ to an approved network. These are Road Waypoint Sets, with each set having a start and end point. Turn on the Network Layers to view the approved network for the vehicle. |
New Area Application within a single Road Manager boundary
- Select the Plan tab.
- Enter or select Area Road Manager using drop-down (if known).
If not known, add Waypoints in the field or use the drop-pin on the map. The Area Road Manager will populate based on the first waypoint location.
Tip  Select the drop-pin, click to blue for ON / or black for OFF
- The approved network will display.
- Map the route.
- Enter the start and end address for each waypoint set or use the drop-pin to add new road sections to your area.
- The route will display on the interactive map
...
- .
...
- A Route Id will be automatically assigned (this can be reused on other permit applications).
- Rollover any point on the route to Drag
...
- and Drop a waypoint.
- Delete any waypoint using trash or edit the waypoint to change the waypoint label
...
- , or delete the
...
- Road Waypoint Set.
- Drawing and measuring tools are also available (bottom left of the map display).
- If the route is not displaying, click recalculate.
| Tip |
|---|
When editing or deleting a drawing line or shape on the map, Save each action afterwards to apply. |
New Area Application across multiple Road Manager boundaries
When you add waypoint sets outside
...
a single Road Manager boundary, a
...
separate area application is required for each Road Manager
...
. The NHVR Portal automates this process to save you time.
- Follow the steps above to create a new area application.
- Upon entering waypoint sets outside a single Road Manager boundary, a notification will appear asking you to complete the route planning (through all steps in the process) and then
...
- click
...
- Generate. This will make sure all of the permit information (from Steps 1-5) is copied into each individual Road Manager application, such as Attachments and Contact information.
...
- Complete all steps in Route Planning.
- Click Generate.
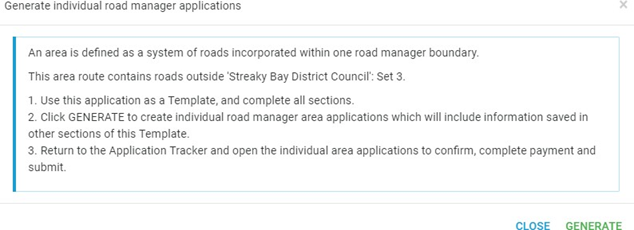
- The routes will be automatically separated according to Road Managers, and
...
- a draft permit
...
- application will be created for each.
...
- Navigate to Application Tracker to see the new
...
- applications. The new applications will have the original application ID as a reference. Open all of the associated applications and submit each one separately.
...
| Tip |
|---|
The original |
...
application you started, containing all routes will now act as a template (not able to be submitted). You can |
...
archive it or leave it as a draft for future use |
...
5. Then complete all TABS:
...
| title | Layers Tab |
|---|
...
Area applications are made up of a number of short road sections that connect from/ to an approved network. These are Road Waypoint Sets, with one set having a start and end point.
...
Turn on the Network Layers to view the approved network for the vehicle.
...
Select the Network Layers using the Layer legend for a grouped view of available layers or the Layer list ![]() .
.
...
. |
Complete remaining tabs
Roads tab
- Select the Roads tab.
- Select the expand icon to see the list of roads under each road owner. Click on a road to add specific notes, such as local road name.
Layers tab - Select the Layers tab.
- Use the slide tool to toggle the colours on the route layer or map layer
...
- .
- Select the drop-down for each layer on the Map layers list to view and turn on/off the map layers.
- Use the Layer legend on the map to select a grouped view of available layers.
Road layers are automatically set depending on the vehicle configuration you select. To turn on all layers, tick
...
Show all layers
...
.
...
...
Tip
...
| icon | false |
|---|
Map layers can be selected from either the
...
Layers tab or the Stack icon
...
on the
...
map.

Selections made in one list will
...
show in the other. The
...
Layers tab view allows you to
...
see the full map when switching layers on / off.

| Expand | ||
|---|---|---|
| ||
To view or change Routing preference or Routing constraints and select/deselect as needed. |
| Expand | ||
|---|---|---|
| ||
If your Route is not displaying, use the RECALCULATE Button. |
| Expand | ||
|---|---|---|
| ||
Use the expand/ collapse icon to see the list of roads under each road owner
|

...
| title | Confirm Tab |
|---|
...
Confirm tab- Select the Confirm tab. The Road Summary will display.
- Add any notes related to the application
...
NOTE: For area applications with more than one Road Manager, the original application (containing multiple Road Managers) can not be confirmed/ submitted.

...
| icon | false |
|---|
- .
- Confirm the route using the
...
- checkbox.
Save.
Tip If there is missing information in any of the
...
Steps
...
, the relevant number will appear in red. These sections must be
...
complete before you are able to submit your permit application.
...
See Attachments (Step 4
...